
How To Give Your Old Furniture A Makeover
Have you found yourself tired of your current furniture? Maybe you’ve ended up with some pieces that are outdated. Well, don’t fret. With a bit of imagination and elbow grease, you can take old furniture and bring it back to life.
Whether you’re a beginner or a long-time furniture flipper, we’re here to guide and encourage you to keep going!
The final day of The 12 Days of Flipmas
Here’s the full Flipmas playlist if you missed it! This was the final flip of our 12 days of furniture flipping.
This Flipmas journey was both challenging and rewarding! We can’t believe we’ve reached the end. Neiman and I really hope this brought you some Christmas spirit (even if you’re watching in the middle of spring).
And on top of that, we hope it inspired you to keep chasing projects!
There was a twist to listing this piece
While we still listed this on Facebook, we did something a little different. Last year, we were able to donate Christmas presents to 10 families in need!
We wanted to keep the holiday spirit going. This year, FFT donated this table and chairs to a family in need for this holiday season! It feels so good to give back and help others. After all, that’s what the holidays are all about.
Disclaimer:
This article contains affiliate links. I will receive a commission for items purchased through these links at no extra cost to you. I appreciate your support. Please read all labels and follow all manufacturer safety recommendations when working with paints, stains, and other equipment, and wear and use appropriate personal protection equipment. Readers should attempt these projects at their own risk.
Products I used:
Lilly Moon Smoky Gel Stain [code: FFT10 for 10% off]
Surfprep Sanding System [code: FFT10 for 10% off]
Transforming the 90s oak table set

A set of oak table and chairs
For our flip, we had this table set that is no longer in style. This type of table was really popular in the 90s—all woodgrain, round top, an orange finish, and spindled chairs.
However, the set still has so much life left in it. We see the bones of this piece of furniture and think we can modernize it. All it takes is a fresh coat of paint and some creativity.
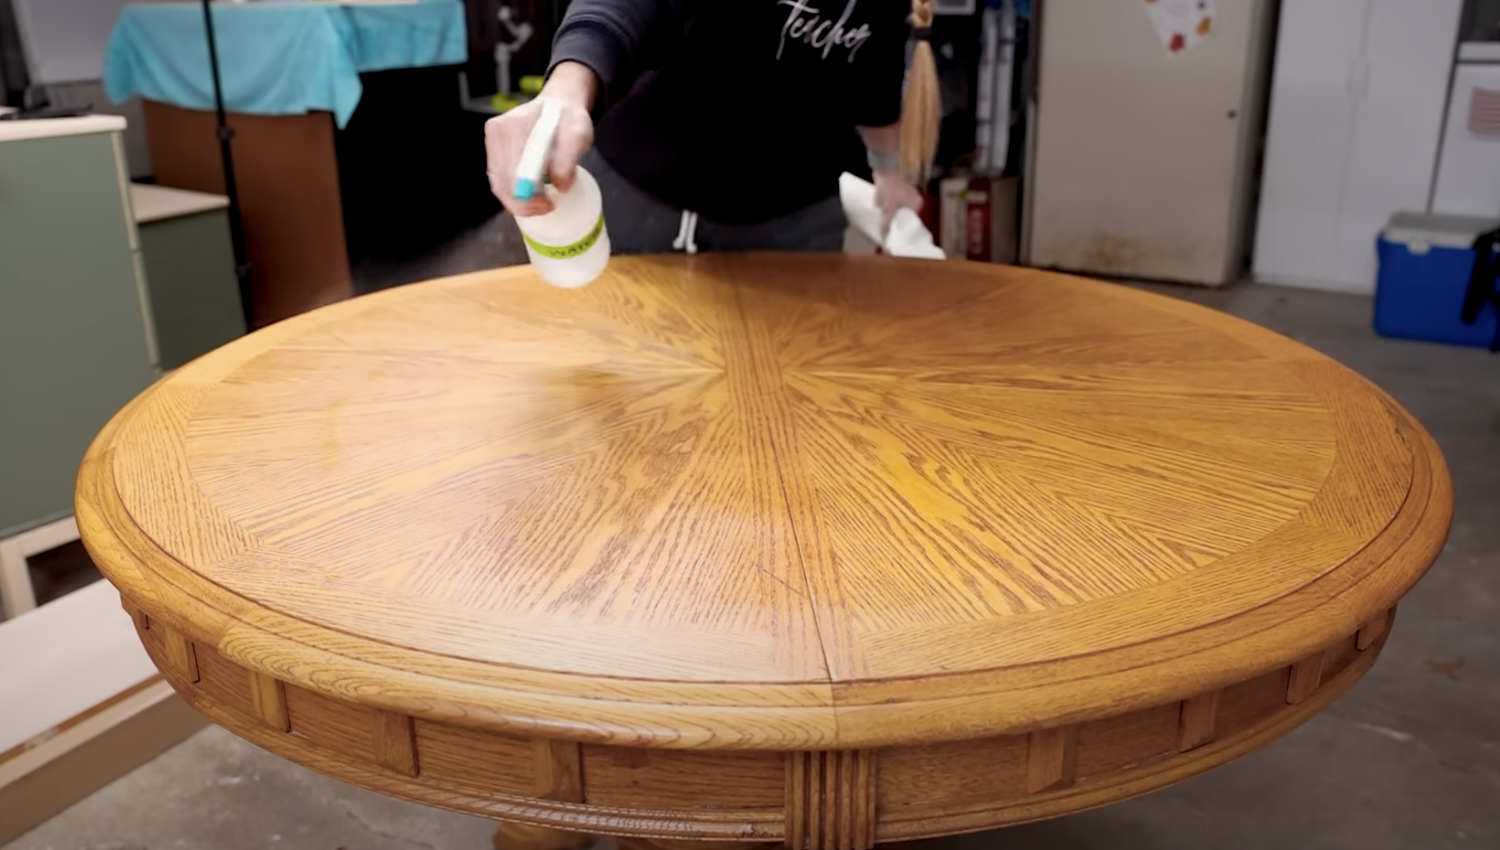
First things first—clean
Cleaning your furniture is always the first step. You should clean before you sand so you don’t grind any oil or dirt deeper into the furniture while sanding.
To clean, spray your Dixie Belle White Lightning concoction onto your table and chairs and wipe them down. If you’re new to this product, you’ll simply combine 1-2 tablespoons of White Lightning into a spray bottle with warm water.
Once that’s wiped, you’ll need a second spray bottle with only water in it. Use the water to spray and wipe down your table to remove any remaining residue.
Next step—sand
Wearing personal protective equipment is super important. Please protect your lungs from harmful dust and mask up! I use this RZ MASK (use code FFT10 for 10% off).
Another product that’s saved my life is the Surfprep Sanding System. Use my code, FFT10 for 10% off, as well. It cuts down on the time it takes to sand different items. It works great on rounded or curved edges. I love the foam pads that contour to the curves of whatever you’re sanding. I also love how well this sander fits in my hand.
The list goes on and on about how much I love this Sanding System. If you’re an avid furniture flipper, I highly recommend this investment. I also have my Surfprep hooked up to a dust extractor. This allows me to be able to sand inside and not get dust all over the place.
We’re going to be stripping the orange finish completely off. To remove a finish completely, start with a lower grit and work your way up to a higher grit number as you move through the sanding process to smooth it out. I used 80 grit to start, then 120 grit and finished with 220 grit for a nice clean finish.
Cue sanding montage: Outdated Orange Oak Table & Chairs Makeover | DIY Furniture Flip

Beneath the orange finish was a stunning woodgrain that wasn’t as easy to see before. I wanted to play up that woodgrain in this furniture flip.
Chairs with a twist
For this furniture restoration, I decided to do something different for the chairs. I wanted to paint them instead of removing the finish completely. To do this, I’m scuff-sanding these to allow the paint to better adhere.
Scuff-sanding was important because this set’s finish was quite glossy to start. What this means is if I applied any paint without first roughing up the surface, the paint will slide right off.
Remember, after sanding, you’ll need to clean the surfaces one more time. Use a damp cloth to remove the dust.

All four of our spindled oak chairs in their original orange 90s finish.
Get creative
This piece was the first table I had full creative control over versus a commission piece. It’s really important to make room for flips like this. If we’re constantly creating things for others without giving our imagination a chance to roam, we may burn out!
After all, furniture flipping is meant to be fun and challenging. It’s a release from the everyday grind.
In contrast
For this flip, I envisioned a dark color contrasting a light wood top. I went with Dixie Belle Silk Paint {Deep Sea}, which is a mineral paint. The great thing about this paint is it is all-in-one. That means the primer, paint color, and top coat are all integrated.
As I’ve mentioned in previous blogs, a little goes a long way with this paint. You will only need two to three coats of the mineral paint line by Dixie Belle.
While I used a deep blue color for the chairs and most of the table, I wanted a light, natural woodgrain top. To achieve this, I used Lilly Moon Smoky Gel Stain [code: FFT10 for 10% off]. I really love how it came out!

Paint time
I used my Wagner Sprayer to paint this piece. You could use a brush and paint by hand. I opted for a spray gun in this case because a table and chairs have a lot of surface area to cover.
If you’re using a spray gun, make sure you have the right consistency of paint. If it’s too thick, your sprayer may get clogged. But if it’s too watery, the color may not adhere as well. This particular paint shouldn’t be thinned out too much since it is all in one.
Reminder: Always use PPE! We love you and your lungs, for real!
I used my RZ MASK (use code FFT10 for 10% off) and Wagner Spray Tent since I’m spraying the paint. The mask will protect my lungs and the tent guards my driveway and anything nearby.
One more thing, if using a sprayer, do a test spray to check your paint flow and get familiar with how it’ll spray. Practice makes practice. ;)
I started with the chairs. It’s helpful to paint the underside of the chairs first and then flip them over to get to the top side. This may help to prevent drips.
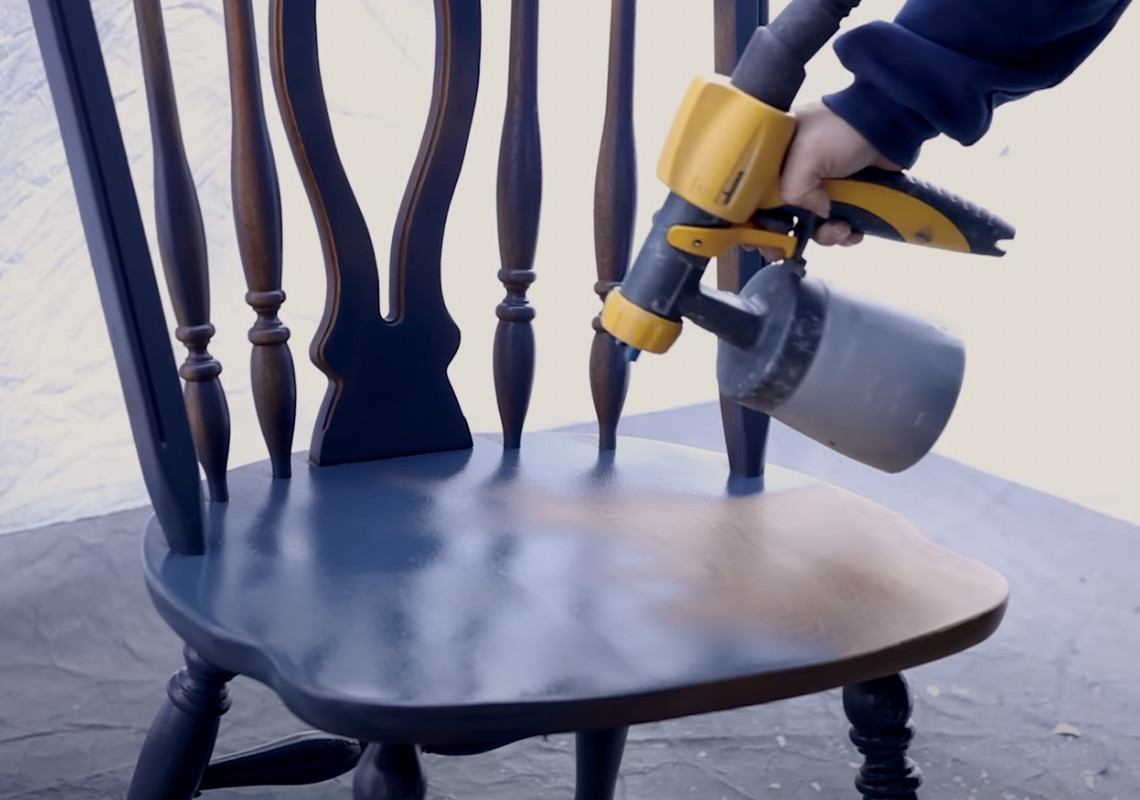
While the chairs were drying, I began on the table. I decided to leave the top of the table as a light wood so I taped it off with plastic sheets. This is a great way to avoid spraying unwanted places. Since there were so many spindles and details on this table set, I had to do two coats. You may need to do the same to ensure an even finish.
A satin finish
Although this paint didn’t require a top coat, I wanted a nice satin finish instead of a matte finish. I used Dixie Belle Clear Coat Satin and also tested out my first spray pattern before spraying the chairs.
You want your top coat to be pretty thin. Make sure to do a test spray to see if you need to thin your top coat out more or not.

Applying the satin finish top coat to a chair with the paint sprayer.
Because I wanted to have the most protection possible on this piece, I did a total of three coats of top coat on the whole table set. This table will hopefully live in someone’s kitchen and be used every day. That’s a great reason to seal it and ensure the wood is protected.
Watch here to see the final results and how much a paint job transformed this outdated set.
Before you go!
If you love watching flips and learning about furniture restoration, then we have news for you! We just launched Flipping Furniture for Fun + Profits: A Beginner’s Course. This is a safe space to receive support along your furniture journey because we do enough things alone.
The course is hands-on and full of helpful information to set you and your business up for success! Learn more about how to get started here. 🎈
Happy to know you,
-Lauren & Neiman